What’s the highlight of a catered chalet ski trip? It’s got to be the afternoon tea, with a different, freshly-baked cake every afternoon to tuck into post-piste. Delicious and well-deserved after a day sweating the slopes.
Booked a self-catering chalet or apartment and want to recreate that sumptuous après ski afternoon-tea vibe? You’re in luck! Here at WhoSki.com, cakes are among our specialist subjects.
And we think your best ski chalet home bake options are:
Visit the local patisserie and buy one of those spectacular, to-die-for cakes.
Order from French Alps catering specialist Huski, who can deliver a selection of cakes ranging from flapjacks to chocolate gateau. (Remember to use our discount code WhoSki5 when ordering.)
DIY if you’re driving: bake in advance and pack a couple of home bakes for your trip.
As a keen home baker, I take the DIY route and always lob a couple of homemade cakes into the boot of the car. I make them in advance, freeze, then grab them as we go. It’s pretty low-effort and saves you LOADS of money.
My best ski chalet bakes are batch cakes or loaf cakes, which freeze well and are highly portable. Going with friends or other families? If everyone donates a bake, you’ll have a full week of afternoon teas covered.
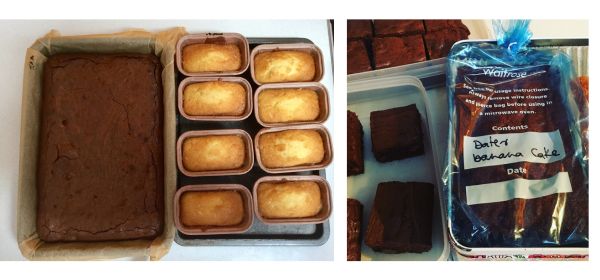
Loaf cakes work well as ski chalet home bakes
My Top 5 Ski Bakes
Chocolate brownies. I like Nigella’s ‘Domestic Goddess’ recipe, and usually knock up a batch the day before we head off so no need to freeze. Swap nuts for chopped up milk chocolate for an uber sugar hit. Perfect snacking after a day on the blacks.
Lemon syrup loaf cake. Loaf cakes freeze and travel well if you make them in a paper liner (Lakeland offers a good selection). Try the ‘Domestic Goddess’ again, for a fail-safe lemon syrup cake recipe.
Tray bakes are perfect for a ski tea table
Snickerdoodle Cheesecake Bars. (see above: left and middle) Easy to make, robust and with a hint of cinnamon. A delicious flat bake that would pack well in your cold bag. Recipe from Edd Kimber’s great ‘Small Batch Bakes’ cookbook.
Flapjacks. I tend to use Delia Smith’s basic recipe, supplemented with whatever dried fruit I have in the cupboard. Chopped dried apricots, dates or raisins help liven things up, along with a spoonful of chia seeds for added benefits.
Fruitcakes and ginger loaf cakes also travel well – with the added bonus that you don’t need to freeze them in advance. A chocolate loaf cake could also double up as a pudding when heated up in the microwave and served with cream or ice cream.
Got a fave ski chalet home bake you always take for your ski trip? I’d love to know!
When you can’t even spot your co-skiers on the piste sans specs, it’s time to solve the ‘skiing when you wear glasses’ problem.
WhoSki.com co-founder Sally has been wearing glasses for years. She used to ski without her ‘long distance’ specs (and just carry a pair for piste map reading). That is, until the trip when she found it so hard to identify her group on the slopes that she kept skiing up to the wrong families. Which is when wearing glasses on the piste became her norm.
Sally’s two top tips to solve the ‘skiing when you wear glasses’ problem:
TOP TIP 1
When buying ski goggles, good brands will let you know if they are ‘glasses friendly’. The goggles are larger but it’s a more affordable option than buying prescription ski goggles.
“This has been really effective. I have problems with both long and short distances and this means as my prescription changes, I don’t need to change my ski goggles,” says Sally.
TOP TIP 2
Carry varifocal prescription sunglasses while skiing, for reading the menu and enjoying your surroundings when you take a break from the piste. Sally says: “This is my go-to look when it’s sunny, and means I can enjoy ‘slope watching’ at the same time as eating my lunch.”
Sally: aceing the ‘skiing when you wear specs’ problem
more solutions for specs-wearing skiers
Glasses don’t fit under goggles but you don’t want to wear contact lenses: Choose a helmet with integral visor: glasses fit underneath. Good ventilation means they are less likely to steam up.
Specs don’t fit in pocket and I’m scared of breaking them: Buy a couple of cheap pairs of low-profile glasses. Or foldable ones that come in a hard case. Tiny, but useful when you sit down for lunch and need to read the menu / check the bill.
Can’t read the piste map without glasses on: Take a picture on your phone, then zoom in when you need it. Saves getting your reading glasses out. Or use the resort piste map app. Beware of phone dying in the cold – keep it tucked away in an inside pocket to maximise battery life.
Bi-focal prescription goggles: Pricey option, but effective.
Magnifying glass in your pocket: Low-tech option that will have the younger members of your party dying of shame when you whip it out on the chair lift.
Join a guided ski tour group: Never worry about directions again. Many chalet hotels, like Club Med, offer a group ski itinerary – or try SkiClub of GB, who have skiing volunteers based in a number of resorts. It’s a great way to make friends, too
Get a credit card sized magnifying lens: Hang it on a cord round your neck or clip into a pocket – quick to access, problem solved!
Follow someone who knows where they are going: Provided you trust them not to lead you down a gnarly black…
Finally, you could always take the familiarity option: ski in the same resort every year (but beware year on year changes to your favourite pistes…).
Embrace the re-sale vibe and sell on your no longer needed ski clothing. It’s simple with WhoSki.com. Here’s how:
Step 1: Clear out your SKI wardrobe
Motivate yourself for a ski closet clear-out by remembering that selling it on helps keep it out of landfill: you are doing the environment a favour. Plus you’re helping monetise your wardrobe – and keeping skiing affordable. Ski and snowboard clothes are hardwearing, so perfect for re-use and re-sale.
Step 2: Make sure your ski clothes are clean and in tip-top condition
Wash any items if needed and check for wear and tear so your buyer knows exactly what to expect. Better condition items will likely fetch a higher price. Any damage? Pay your local sewing repair shop a visit. You may be surprised what wonders they can work on a frayed salopette hem, dodgy ski jacket zip or gaping seam.
When snapping your ski clothing, keep the background plain, photograph from front and back, capture details and highlight any damage / marks etc. Read more selling tips here.
Register at WhoSki.com (super-simple via any device: phone, tablet or PC), upload details of the ski clothes you are selling along with fixed price and images, and post for sale. It’s easy to edit the info afterwards so don’t worry if you make a mistake.
Top tip – make the first photo of your item ‘landscape’ as it fits better on the WhoSki.com shop homepage.
Secondhand clothing does not always sell immediately – although WhoSki.com does enjoy some instant sales, especially at peak ski season. Be patient and wait for the right buyer to come along. Share a link to your post on social media to help attract buyers – and remember to celebrate your sale. Remember too: at WhoSki.com we donate 10% of our commission to charity on every item sold.
Delight your customer with a swift response by getting their ski clothes delivered as quickly as you can. Re-use packaging where possible; turn an old delivery bag inside out, recycle a tough paper bag, and think about using strong paper tape rather than plastic.
Keep your customer informed via the WhoSki.com private messaging system (and hang on to your postal receipt to track your item’s progress).
ANd that’s it: simple!
Let us know how you get on – are you happy with the process? How much money have you made on your good-as-new ski clothing – or how much have you saved by buying secondhand? Drop us an email with your comments.
Register at WhoSki.com to buy and sell, PLUS – coming soon! – receive updates about latest ski clothes that go on sale so you won’t miss out on the best pre-loved piste wear.
If you think about what you put inside it, maybe it’s worth remembering how long you’ve had your current ski helmet. How do you know when it’s time to replace your head protection?
Helmet specialist Giro recommends replacing your ski helmet every three to five years, depending on usage and handling:
“This is based on observation of the average user, and factors like wear over time, weather, handling, the potential for degradation from personal care products like sunscreen or bug spray, and the simple fact that helmets do improve over time.
“While helmets kept in good condition can provide protective capability beyond the 3-5 year recommended lifespan, it’s also true that they can degrade over time.”
get your ski helmet checked over
Most importantly, when your helmet suffers an impact, you must get it checked over or replaced immediately even if there is no visible damage.
According to Giro: “This is because helmet liners are made to absorb energy from impacts and they do this through their own degradation or destruction – like an airbag in a car. If the liner is compromised from an impact or other factors, it may not offer the full protective capability it was designed to provide.”
Even if you don’t have an accident and bang your ski helmet directly, it can still suffer knocks from chairlift barriers etc while you are on the slopes. Bear in mind too that the protective core of your helmet experiences prolonged pressure from your head, minor bangs in transit and from being placed on hard surfaces etc.
Packing your helmet full of ski clothing during travel can also have an ongoing (albeit minimal) effect on its protective ability. The cumulative effects of pressure and impacts over time mean the cushioned core of your ski helmet will gradually lose volume, leaving it less effective if you fall or are involved in an accident.
Update for Comfort and safety
A ski helmet that has a few visible dings and dents, and is more than five years old, is one that probably needs replacing. In addition to the safety factor, technology and materials improve over time, as do comfort options – like detachable ear pads, Bluetooth®, visors and air vents.
We advise:
Save money on ski clothing by buying and selling second hand, and divert your budget towards a good quality ski helmet to protect yourself on the piste.
When buying preloved ski equipment, or after a prolonged period away from the ski slopes, always get it checked over by a professional before use. Make friends with your local ski shop – their expertise could prove vital.
Apart from kitting yourself up with the right clothing and equipment, what else do you need to know as a novice on the ski slopes? These tips for a beginner skier may help…
beginner ski tips:
SKI BOOTS: They will feel tight but not so much they cause discomfort. Don’t be tempted to go up a size, but do head back to the hire shop for a refit if they really cause you grief. They should not cause you to wince (or worse) or cut off circulation.
ALCOHOL: Tempting as a boozy lunch may be, save your units for the après – once you are back in resort and off your skis. If you are involved in an accident, you are likely to be breathalysed by the piste police. All skiers should be aware: in Italy, is illegal to ski/snowboard under the influence of alcohol or drugs. Ditto in France, also Colorado and other ski resorts in the US.
Save the G&T for post-ski relaxation
LESSONS: Your ski trip will be so much better if you get tuition in the basic techniques. YouTube is not a ski instructor – although watching some tutorials before you go is helpful. Try lessons on a local dry slope or indoor ski centre as your ski trip approaches. Beginner ski tip: book early as UK practice slopes are very popular, especially if you want lessons.in the run up to your ski trip.
THE LAST RUN OF THE DAY: Don’t be tempted (or talked into) finishing your day on the slopes with a tricky piste. Runs can get icy/slushy depending on temperatures, as well as busy towards the end of the day. Visibility deteriorates and fatigue sets in. Ending your ski day on a slope within your abilities will enable you to avoid terror, possible injuries and start the following morning feeling confident and raring to go.
NEVER SKI ALONE: Applies to all skiers but especially if you are a beginner, lack technique or confidence. You will feel much happier and be much safer if you have someone keeping an eye on you.
Pre-ski trip prep:
KNOW YOUR PISTE ETIQUETTE: Familiarise yourself with the Skiers’ Code of Conduct. Keep your speed down, always look uphill before you set off, stop at the side of the piste rather than in the middle, avoid stopping at bottleneck points, be aware of what’s going on around you. Find out more: 5 ways to stay safe on the slopes
PRE-SKI FITNESS: Stamina and aerobic fitness will pay dividends. A lot of skiing consists of hiking around carrying heavy, awkward equipment like skis and ski boots. Then there is the stress on your legs, feet and ankles, shoulders and abs. Make squats and wall sits your new BFFs (best fitness friends). Visit our Ski Fit partner My Life Tonic for tips and videos (plus a WhoSki.com discount code via our Partners page here).
Got any beginner skier tips? Share them with us on the WhoSki.com Facebook or Instagram pages.
You’ve most likely been provided with a packing list, but what are the must-have warm wear essentials for your child’s school ski trip?
Also: what does that ski kit jargon mean? Is it all really necessary? And are some items ‘more essential’ than others?
Forget about skis and ski boots – trip organisers will sort those out. Your job is to make sure your child is warm, dry and comfortable on the slopes. Follow our expert school ski trip packing list tips to find out what ski wear your child simply cannot do without – and save time and money.
School ski trip packing list tip No 1 : Weather can change rapidly in the mountains. Conditions can change from clear blue skies and sunny slopes to falling snow and limited visibility within a matter of minutes. Ensuring your child is equipped for all eventualities is key for safety, fun and comfort: the makings of a successful ski trip.
School ski trip packing list tip No 2 : Buy second hand where you can. Kids grow out of clothes quickly, so odds are you will be able to fit out your child with good-as-new, preloved ski wear at a fraction of the price for new kit. Register at WhoSki.com and you will receive regular email updates as new items are listed on site.
Ski jacket: Your child’s essential ski outer layer, and usually the most costly item in your ski wardrobe. Choose a jacket that is large enough to fit multiple layers beneath ie a thin base layer, a thicker mid-layer and a microfleece to keep your child warm in the coldest conditions. They can add / remove these layers as necessary depending on weather, altitude and exertion levels.
The perfect ski jacket will be wind-resistant and waterproof, have multiple, zippable pockets, under-arm vents, a ski pass pocket on the sleeve and a powder skirt. A thinner jacket with layers beneath will make it easier to regulate temperatures. A hood is unnecessary as your child will be wearing a ski helmet while on the piste. Think safety: a bright-coloured ski jacket makes your child easier to spot on the slopes.
Preloved is the affordable option over new – and remember to sell it on after your child’s trip if that ski jacket won’t fit them again next year.
Ski pants / salopettes / trousers: Whatever you call it, your child needs specialist ski legwear. A belt or braces will ensure ski pants don’t slip, vents will help regulate temperature, while reinforced knees and ankles will aid longevity and flexibility of movement. Comfort is key, so make sure ski trousers are roomy enough to fit thermal underwear beneath. Salopettes generally sit higher than ski pants and may include a bib front: handy to help keep out snow when your child takes a tumble on the piste.
Ski pants will flare towards the ankles to allow for ski boots. Many boast an inner ‘skirt’ around the ankle: this sits over the ski boot to help keep out snow. If you’re buying second hand, the ankle area may show some damage – this is perfectly normal as ski trousers often get caught on boot clips and ski bindings. Minor damage will not impair usage.
It’s all about layers
Base layers: For a week-long school ski trip, you will ideally send your child away with a separate, long-sleeved, thermal base layer for every day of skiing. This item of ski wear will sit next to their skin, keep them warm and wick away sweat during a day of exertion on the slopes.
On warmer days, this may be the only layer required beneath your child’s outer ski jacket. In colder weather, they could wear up to two further layers. Namely…
Mid layers: Two sets of mid layers will be ample for a one-week school ski trip. Simply put, a ski mid layer is the piece of clothing that goes between their thermal, sweat-wicking base layer and their waterproof ski jacket. It will keep your child warm, without weighing them down or preventing ease of movement.
A mid layer with a neck zip will help your child regulate their temperature by allowing in a bit of air as they heat up, or letting them zip up to their chin when they are standing around or on a chair lift.
Merino is the crème de la crème material for a mid layer but merino mid layers are expensive and need careful laundering. A synthetic, polyester mid-layer will be fine for school-age skiers. Keep man-made fibres out of landfill by purchasing second hand – and as ever, sell ski wear on afterwards.
Cosy mid layers: slip on under a ski jacket
Fleece: A microfleece, thin puffer jacket or hoody plays a key role in your child’s ski wear layering system. They can slip it on as another heat-retaining layer beneath their ski jacket when temperatures are extremely low – and wear it around the hotel / hostel/ chalet when they get back from a day on the slopes. A padded gilet is another useful option to keep ski kids cosy.
Hands and feet…
Ski gloves: Specialist ski gloves are essential. Longer, gauntlet style ski gloves that cover wrists are best as they keep out draughts. Integral elastic wrist leashes help prevent them from getting lost eg when you remove them to check your phone / piste map etc. A pair of thin glove liners is also recommended.
Mittens and fingered ski gloves are interchangeable, depending on personal preference. Mittens are generally warmer in lowest temperatures. Urge your child to put gloves to dry on a radiator at night so they will be cosy and comfy for the next day.
Ski socks: Specialist ski socks are longer than normal socks with heat-retaining qualities and the right padding in the right places. Three pairs for a week-long school ski trip will be enough: one pair on, one pair in the drawer and a pair airing on the radiator. Or, more likely, screwed up on the floor. Oh well.
Snowboots: A chunky pair of cosy, waterproof snowboots is an absolute must-have for your child’s school ski trip. They make for warm feet whether they are playing in the snow or tramping around resort, and help prevent tumbles on icy surfaces. Get your child to wear snowboots for the journey to cut down on luggage weight. Trainers really don’t work in ski resorts as outdoors wear.
Buff: A buff is a thin, tubular neck scarf with multiple uses that will protect your child’s chin, neck, face, head and ears from the cold, including wind, snow and sleet. Much safer than a scarf (can’t get caught on anything or fly off) a buff is also easier to tuck into a pocket when not in use.
Must-have school ski trip accessories:
Goggles: A pair of goggles is more protective than sunglasses, less easy to lose, warmer for the face on a cold day or when it is snowing. An adjustable strap means goggles can live on your child’s helmet even when not in use. Sunglasses are an optional extra.
Goggles: a ski trip packing list essential
Slippers/Crocs/Birkenstocks: Outdoor footwear is banned in a lot of ski accommodation, so your child must take slip-ons to wear between boot room and chalet/hotel room. It’s good to give feet a break from restrictive ski boots, and without a robust pair of slippers that has a strong sole, your child’s socks will quickly get and stay soggy. Yuck.
Lip balm and high SPF sunscreen: The sun can be incredibly strong on the slopes. A pocket-friendly tube of high-factor 30-50 SPF sun cream means your child will be able to top up on protection when they get back on the slopes after lunch. Make sure your child packs a couple of lip balms too, as they are easily lost.
A small daypack: A light backpack where your child can stash a spare mid layer or fleece for days when the weather is variable, along with a water bottle, mobile phone and any other essentials, will be useful. Even if they don’t use it when skiing, it will be handy for après ski outings and activities.
Hat: Not necessary for skiing, as your child will be wearing a helmet (provided as part of the ski hire package) while on the slopes, but a hat is essential for off-piste, in-resort activities. A woollen beanie or similar will do the trick.
Looking for kit for your child’s school ski trip? Visit the WhoSki.com shop for good condition, affordable, second hand ski wear.
‘Easy ways to ski green’ is the topic of two workshops WhoSki.com will be leading in the Snow Skills Cabin at this month’s National Snow Show Week events. Join us at the NEC Birmingham on Sunday October 15 at 12.30 and / or London ExCel on Sunday October 22 at 12.30.
We’ve got special guests including Sarisher Mann from SATI (Sustainable Alpine Tourism Initiative) who will be joining us after her Mountain Expedition raising awareness of climate change in the Alps this summer. Also on stage with us for National Snow Week 2023 will be sustainable travel expert Iain Martin from Ski Flight Free and Matt Sexton from Futerra, a leading international sustainable change agency. (Check our social media to see who’s joining us at which Snow Show event.)
We’ll be providing top tips on taking steps to help reduce your environmental impact on your winter sports holiday. Plus there’ll be the results of the WhoSki.com Ski Green survey (we’ve had some interesting responses…).
From how you dispose of your no longer needed second hand ski clothes, to how you travel: we look forward to hearing your ideas and views in our workshop sessions.
How much does it cost to kit your kids out for an expedition? And what if that kit never gets used?
The 2023 World Scout Jamboree – oh dear! We feel so sorry for those Scouts who had worked so hard for so long to get to South Korea, only for a series of organisational and climactic mishaps to make it a trip to remember for all the wrong reasons.
Costly kit lists
Here at WhoSki.com we were also struck by the words of one parent, who told The Times, “You get a big kit list… I spent about £1,000 in Decathlon. Most of it will never get used.”
If you’ve ever signed up a child for a Duke of Edinburgh expedition, an adventure trip or a Scout or Guide camp, you’ll sympathise.
Kitting out your kids with the necessary equipment for every eventuality – rain, wind, heat, insects, snow – is essential. The official kit list is lengthy. The cost is high.
But much of that expedition gear, which ranges from waterproof jackets to mosquito nets, Camelbak hydration carriers to gaiters, walking trousers to rucksack liners, barely gets used. Let’s face it, some of it never comes out of the bag.
Unused kit: perfect for re-sale
A lot of equipment is used only briefly because your teenage kids grow out of it before their next adventure. Which makes it perfect for secondhand re-sale. And WhoSki.com is the perfect place to sell it on.
We have expanded our categories beyond ski to include a wider range of pre-loved outdoor clothing and kit.
So rather than stuffing that outdoor gear in the loft, why not sell it on via our secondhand marketplace? It’s your chance to recoup some of your initial outlay and help make someone else’s DofE expedition a bit more affordable and sustainable.
I’ve lost count of the number of welly boots my family has churned through over the years. Which set me wondering: what happens to old wellies once you don’t want or need them any more?
We’ve all owned a pair of wellies. My current Hunter wellies have been going strong for about 15 years – and my daughter has inherited their predecessors.
Meanwhile, a cheapo Decathlon pair are doing sterling service as my rowing wellies, and shorty Joules wellies keep my feet dry while gardening.
Wellies are hard to recycle
Even when your wellies are made from certified eco-sourced rubber, mixing rubber with other materials during manufacture unfortunately makes them difficult to recycle when discarded.
It’s even worse for old wellies made from materials like PVC. Recycling of synthetics is still in its early days; they take hundreds of years to decompose in landfill and emit toxins when incinerated.
So choose carefully when you buy. Purchase pre-loved if you can, and never put old wellies in the bin: waste dumps are among the worst places they can end up. If there’s any life in them – no leaks, intact tread – try selling them via WhoSki.com or donate to a worthy cause.
Are your old wellies fit for re-sale?
If you are selling on or donating your unwanted old wellies, check that they are in good condition without cracks or damage that might leak. Make sure the soles are still in good shape, with tread robust enough to prevent slipping in mud or on wet surfaces.
Check welly tread is fit for purpose
When taking pics of your wellies for listing on WhoSki.com, photograph these details. If they are patterned, make sure the image is clear with no background clutter, to help bring your listing to life.
Eco-rubber boots
Remember: rubber comes from plants. Choosing wellies with FSC (Forest Stewardship Certification) means you can be certain the rubber comes from a sustainable source.
Wellington boot manufacturers which use FSC-certified natural rubber include Hunter Boots (which, sadly, went into administration earlier this year) and Lakeland.
Welly recycling options
If your wellies are too clapped-out to sell on, then check out local recycling point options. Try the recycle now site.
The French brand Aigle is a spendy option – warning, expensive! – but their boots are among the most sustainable you can buy and are guaranteed to last. Find out more.
Buy well to avoid welly waste
Keeping old wellies in active usage as long as they are fit for purpose is always the ‘greenest’ option. Recycling takes energy, and incineration produces toxic pollutants.
To reduce your environmental impact, consider investing in high-quality wellies that are made from sustainable materials and designed to last for many years. For kids, make sure their wellies are kept in active usage for as long as possible before they need to be thrown away. Sell them on via WhoSki.com or swap with friends and family to avoid buying new where possible.
Get creative with your old wellies
Once your wellies are really no longer wearable, perhaps you could repurpose them? Cut them down to use as shortie wellies, or transform them into planters.
Some schools and community groups use old wellies to plant up herbs and flowers, creating a fun and colourful display. It’s a good way for the kids to learn a bit about gardening as well as the impact of their wellies on the environment.
Thinking of signing up to the Three Peaks Challenge? You’re in luck. WhoSki.com’s Sally is freshly back with insider tips on conquering the UK’s three peaks in just 24 hours.
Read on for her women’s guide to the Three Peaks Challenge, with the low-down on those less-discussed issues you’re dying to know about but may feel a tad awkward in asking…
Sally writes: There were three topics that came up again and again among our eight-strong all-women group in the run-up to our Three Peaks Challenge:
Kit
Food
Loo stuff
Weirdly, these seemed to preoccupy us more than the training. Probably because they aren’t addressed on many blogs, which focus on how to prepare for the event through exercise, steps, hill walking and nutrition.
So here are my women-focused pointers for a Three Peaks Challenge newbie worried about what to wear and take, where you’re going to ‘go’ and what you need to eat to conquer a very challenging 2,957m of altitude over 26 miles in 24 hours.
Let’s start with kit
‘Pack light, don’t overthink it.’
Take walking poles and use them; you may sound like a clippy-clop horse on your gallop to the summit, but using them takes SOOOO much pressure off your knees. I borrowed walking poles from my sister and they were a godsend.
Pack a spare t-shirt and pair of knickers to change into for your final ascent. Simply swapping into a fresh top and pants was a massive mood and energy booster. Forget changing your trousers or shorts, though – it’s not necessary.
Carry some handy wipes (biodegradable, of course) and a small roll-on deodorant for a swift freshen-up during loo breaks.
Take a light blanket for the mini-bus. It was a hot weekend for our Three Peaks Challenge, so I pulled my blanket over my head to block out light while resting on the journey between ascents.
Glasses – a total pain in the backside. I kept misplacing mine on the dark minibus; take varifocals if possible and keep them in an easily accessible pocket.
If you want to take photos (bear in mind that if you’re taking your Three Peaks Challenge seriously, you won’t have time to stop during ascents and descents), keep your phone / camera in a pouch on your front so you can easily grab it for on-the-go photography.
Comfort is key when it comes to walking boots. Our final, relentless walk down Snowdon was the one that created the most foot problems – blisters on toes and bruised big toes (easily hidden using nail varnish). Socks are also so important: do not skimp on them.
Check your head torch at home before you set off on your Three Peaks Challenge. Wear it at night and in action to get the angle right to illuminate the path ahead of you.
Use a heel insert if you suffer any pain during training. I bought some Skechers Arch Fit trainers and wore them every day before the walk. They removed all my pain within 10 days, meaning the training played havoc with my feet, but the challenge didn’t!
Borrow kit or buy second-hand when you can – how often will you re-use walking poles or waterproof trousers? And clearly you should re-sell any kit after your event, if you’re not going to need them again. The WhoSki.com marketplace is a great place to do so!
We went with a Three Peaks Challenge company that provided a thorough kit list; make sure you take everything listed or you will not be allowed up those mountains.
food
I reckon I spent most of my time beforehand visualising what food I would be eating and when, and fretting about whether it would fit the mark to keep my blood sugar levels consistent. All our Three Peaks Challenge pre-meetings included long conversations about food.
Our guides provided snacks, but do supplement these with your own snack choices. Make sure they are easy to grab while you walk and avoid anything too dry as they will be hard to swallow. (My bag of Cheddars didn’t do it for me, as I discovered…)
The guides we went with didn’t supply bananas as they were concerned about the skins being discarded then decomposing too slowly and in the wrong place. I would have killed for a banana en route…
Experiment with different snacks before you set off. I visited Holland & Barrett for the first time in my life, and discovered that they had some great options for a non-nut eater like me.
Being unable to clean your teeth en route is horrid, especially with all that snacking. Chewing gum is the perfect mouth refresher during coach trips between peaks – also a good ice breaker to share with fellow walkers.
Disappointingly, there was no cup of tea or bacon butty for us at the end of the final mountain, so make sure you plan an early pit-stop on your journey home.
toilet stuff: we all have to do it…
If you are an all-women team, expect to queue. You literally cannot take a quick pee anywhere, on any of the mountains: there are basically ZERO trees and bushes to squat behind. Then, after you and everyone’s auntie have saved it up for hours, you will descend en masse for the paltry three public toilets – cross your legs, it can take a while.
Being on your period during your Three Peaks Challenge would be really tough. You may have to go for up to five hours without access to a loo. It is worth investigating whether there is any way you can manipulate your menstrual cycle to avoid having your period while you are walking. At the foot of Snowdon, our final peak, we ended up in a car park so early in the morning that no loos were open.
Farting: yes you will fart. You will all fart and you’ll smell other people’s farts. But you won’t care. The snacks play havoc with your gut as does the sleep deprivation, the altitude and the lack of sanitary arrangements on demand (see above). We all talked a lot about farting. Just make sure it’s not the only topic of conversation. We all do it but that doesn’t mean we all want to talk about it the whole time…
Pooing – make sure you carry your own loo roll as the car park loos are often lacking paper or the dispensers don’t work (as I found out. Big shout-out to my Three Peaks teamies who responded to my pleas for help…).
team spirit
I was lucky to be walking in a super-supportive Three Peaks Challenge group of women I regularly exercise with through FitState. We took it seriously, but not TOO seriously and felt able to admit ‘I could have thrown in the towel walking down Ben Nevis’ – ie our first peak – and still be picked up again by companions. Support and logistics would have been pretty difficult without doing the Three Peaks Challenge as part of an organised group.
The rest times en route between mountains really do re-energise you. Even when you pile onto the bus after a tough peak and think you can’t take another step, you’ll be surprised by how the journey puts things into perspective.
Lastly, I 100% recommend you share private transport – we had a mini-bus – on the way home. You’ll stink, be knackered and the public probably won’t want to be near you. But you can stop for a McDonald’s or a Greggs and not feel bad about it. And you can laugh to your heart’s content at your AMAZING shared experiences, however gruelling they felt at the time.
Now I’m back home, our achievement is still slowly sinking in – what we went through and how far we travelled together, with joyous flashbacks to some hilarious situations and memories of awe-inspiring scenery.
That will stay with me for a long, long time.
Walking for teenage mental health
Sally walked the Three Peaks Challenge in aid of teenage mental health, raising money for WhoSki.com’s charity partner stem4. Visit her Just Giving page here if you wish to donate. We give a proportion of our commission on every sale via the WhoSki.com marketplace to stem4.
Outdoors, on the water, in the fresh air – we love marine activities. Simple steps will help you keep on the right side of the environment, to green up your watersports habit this summer.
CHOOSE BIO-FRIENDLY SUN SCREEN
It was established in the early 2000s that the chemicals in some sun screens are harmful to coral reefs. Further research indicates that protective sun creams can also damage other marine organisms including wildlife.
Oxybenzone and octinoxate are among the culprits, and sunscreen containing these chemicals is banned in certain sensitive marine environments and resorts. Check the ingredients in your sun cream: choose marine-friendly and biodegradable formulations.
Fresh water in lakes and rivers also suffer pollution by sunscreen, scientists now believe. Harmful side effects include the water surface ‘sun cream slick’ that can prevent aquatic insects from laying eggs, thus depriving other river and lake dwellers of food supply.
Chemicals in sunscreen can harm fish, mussels and algae too. Research continues, but in the meantime, opt for eco sun protection when you swim, surf, paddleboard – whatever your watersports habit.
LEAVE NO TRACE
Most of us are aware of the need to leave only footprints – but how about going one better, and heading home from the beach / riverbank / lakeside with MORE than you brought by doing a quick litter pick every trip?
Take a 10-minute walk up and down the waterside between paddleboard outings and gather whatever bits of rubbish or general manmade debris you find. Stick them in a bag and put them in the bin / recycling when you get home.
Look out for local clean-up initiatives while you are water-side and do your bit. Plastic Free North Devon, for example, runs a series of green action days to deal with the rubbish that is clogging our shores.
Look for secondhand watersports equipment before you buy new – and sell on any pre-loved outdoor activity items you no longer need.
For example, watersports kit like boogie or body boards, essentially a sheet of polystyrene wrapped in a thin layer of nylon decorated with a cartoon character or similar, are cheap to buy but an eco nightmare. Surfer Todaycalls them ‘a silent environmental disaster’.
Rather than buying a cheap single use board, bucket or spade for the kids that won’t even last the weekend, invest in quality equipment that you can use repeatedly, then pass it on to another family member or sell on via WhoSki.com.
Reducing consumption is key to reducing your carbon footprint, reducing air miles and preserving valuable resources.
RENT BEFORE YOU BUY
Not sure whether paddleboarding is really for you? Think you’ll only go surfing once a year? Maybe you don’t need to clutter up your shed / loft / garage with a large piece of watersports or outdoor activity equipment you’ll barely use.
However cheap it is to buy, it is much less costly to the environment to hire or rent your watersports gear where possible. Stuff like wetsuits, kayaks and canoes requires a lot in the way of (often unrecyclable) raw materials to create, and most are used very little.
Green up your watersports habit. Try hiring on the spot from local providers and check their eco credentials. Or take a look at our circular economy friends KitUp who are building a UK-wide network of outdoors equipment owners willing to rent out their equipment on demand.
A weed is of course just a plant in the wrong place. And when that ‘wrong place’ is stinging your legs while you’re on the trails, weeds are a pest. So how to stop the stings and beat the weeds next time you’re out biking, hiking or walking?
Our three tips on ways to beat the weeds:
1 LEGS UP!
Ouch! Cyclists, mountain bikers and trail bike commuters know. When weeds are right on your leg and ankle level, brambles and stinging nettles can be mighty uncomfortable. The solution? Sit down – legs up: freewheel through the worst and hope for the best.
2 ZIP-OFF TROUSERS
Convertible zip-off trousers may just be the spring hiker’s best friend. Legs on while you are thigh deep in skin-irritating weeds and nettles, then zip them off for comfort once you’re clear of the undergrowth.
Zip-offs have numerous benefits, and are perfect for DofE expeditions as they are so versatile.
Warm enough to wear shorts at last? Walkers know, this wet spring has been boom-time for weeds with cow parsley growing higher than your head and super-strong nettles just waiting to do their worst. How can you beat the weeds when you’re staying cool in cut-offs?
Cover up is your best option. If you can’t face long trousers as above, opt for long socks and roll them down when you’re out of the weeds and into the meadows.
Long socks will also help prevent ticks jumping aboard if you’re in an area where infestations have been reported, or livestock have been grazing.
PS Don’t get us wrong: we LOVE weeds at WhoSki.com. In fact, we would say they probably aren’t weeds at all. Wild flowers and plants are essential for the bugs and birds that make the great outdoors even greater.
We are just not such a fan when weeds are causing us aggro on the trails (says WhoSki.com co-founder Nicola, who slipped on a muddy hike recently and landed in a patch of super-strong stinging nettles. Skin was still a-tingle THREE DAYS later. Ouch.)